How to make these cake pops that are a hit with the kids

img_8964.jpg

http://indianexpress.com/article/lifestyle/food-wine/express-recipes-chocolate-cake-pops-kids-foodie/#sthash.v5odNlWt.dpuf

It was meant to be a Victoria sponge – that classic British vanilla cake that is sandwiched with jam and whipped cream. But a few minutes after my sponge cake batter went into the oven, the electricity once again went off. I watched helplessly as my cake — which was happily swelling with pride — sank like a punctured balloon. I took the cake out of the oven – it wasn’t bad, just sunk, making it unpresentable in its current avatar. Usually, I would have cut it up into pieces and no one would have been the wiser. But I had to take the cake for a Harry Potter-themed party the next day, and now I had no dessert. Disaster with a capital D.

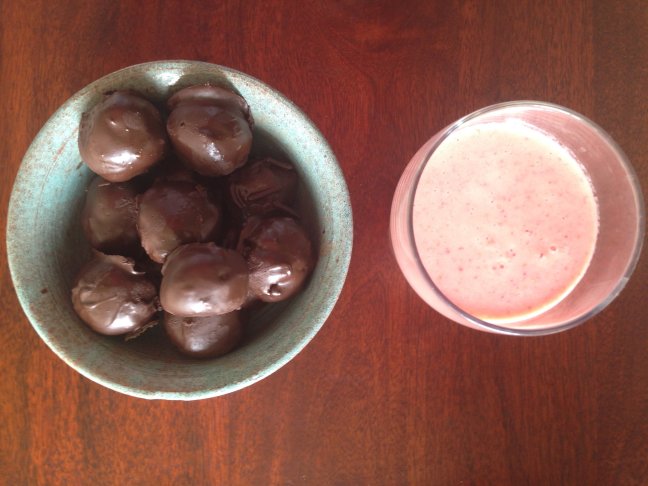
After I hopped around my house, shaking my fist at the electricity board for a while, I calmed down enough to head to Bakerella’s website for her cake pop tips. Bakerella, aka Angie Dudley, made these delectable desserts famous with some of her innovative decoration ideas. Cake balls are basically cake mixed with frosting and rolled into balls and dipped into a chocolate or candy coating. Add a skewer to it, and it becomes a cake pop. Ice spooky eyes onto them and they become Halloween treats, or ice on a pair of spectacles and a scar and they become perfect for a Potter party. Cake pops are so much fun.I didn’t have skewers or toothpicks – it was just one of those days! So, I rummaged through my baking cupboard and found a box of hagelslag, Dutch chocolate sprinkles. I rolled half the the cake balls onto the sprinkles (you can get kids to help), and happily dubbed the creation Cockroach Clusters. In case you are wondering, that’s straight out of a Harry Potter book. The other half I refrigerated and served cold.

The fabulous thing about these pops is the versatility. You can dip them into white chocolate or dark, use candy melts to coat them, ice them or leave them plain, use chocolate or vanilla cake. It doesn’t matter. They are still perfectly gobble-able. As one of the teenagers at the party told me, “These are the best chocolate whatevers’ I have ever had.” I will take that as high praise.

cake pops process1_759 
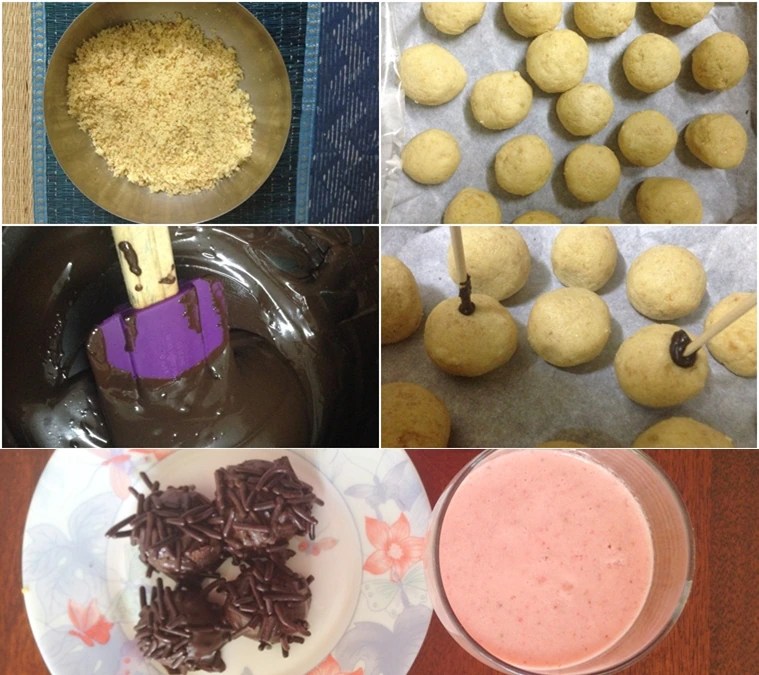
The process (clockwise from top-left): 1. Crumble the sponge cake slowly; 2. Keep mixing frosting with cake crumbs until you can shape the dough into balls that will hold their shape; 3. Melt the chocolate along with the butter, taking care to not overheat the chocolate as it will harden; 4. Dip skewers into chocolate and insert into cake balls if you’re making cake pops; 5. Roll the cake balls in sprinkles when the chocolate layer is still wet.Cake Pops
Serving: 35 nos

Ingredients
1 – sponge cake (I used Delia Smith’s recipe, but any will do)
200g – Dark chocolate, used for cooking
25g – Butter
1/4 tsp – Vanilla extract
Block of Styrofoam or a dhokla steamer (the round one with holes)

For the vanilla frosting
1/2 cup – Unsalted butter at room temperature
1 1/2 cup – Icing sugar, sifted
1/2 tsp – Vanilla extract
1-2 tbsp – Milk

Method
* Crumble the cake with your fingers into a mixing bowl. Work slowly until you have even, fine crumbs. You can use a food processor if you like. You can cut off the crust of the cake if it’s too hard, but honestly, it crumbles fine, unless it’s a burnt cake.

Prepare the frosting
* Using a hand blender or stand mixer, beat the butter until very smooth. You can do this by hand, but it takes ages.
* Add the vanilla extract.
* Reduce the speed of the mixer and add sugar, a little at a time. Sifting the sugar in advance means there will be no lumps.
* Beat for 5 minutes until the mixture is light and fluffy. You can add some milk if you need to give it a slightly softer consistency.

* Spoon in the frosting, a little at a time, into the cake crumble.
* Keep mixing until you can shape the dough into balls that will hold their shape. If you add all of the frosting at once, it will become soggy. Instead, add little at a time and the rest you can save for frosting the cake pops if you wish.
* Shape the dough into ping-pong sized balls. I made two sizes, one small and the other slightly larger so that they could become hefty cockroach clusters.
* Place the cake balls on a shallow tin, lined with baking paper. Cover with cling wrap and refrigerate for at least an hour. Two hours is better. This ensures that the balls retain their shape. (Note: At this point the cake balls can be frozen for later use. But if you plan to make them a day or a few hours in advance, then avoid freezing them as they may crack.)
* On a double boiler — put a pan with water to boil and place a thick-bottomed pan on top of it in such a way that it doesn’t touch the water – melt the chocolate along with the butter. Be very careful at this stage. Overheat the chocolate and it will harden unattractively. What I do is when the chocolate has almost melted, I remove it from the heat and beat the rest of the lumps into the sauce.
* Add a few drops of vanilla extract.
* Transfer the chocolate to a deep bowl and cool slightly.
* Meanwhile, remove the cake balls and let them thaw slightly. If you’re making cake pops, insert the skewers at this stage. Remember to insert them only halfway through.
* Now, dip the cake balls into the chocolate. Don’t roll them or else they will get an uneven texture of the chocolate. Just turn them to get an even coating and let the extra chocolate drain off. Stick them onto the Styrofoam block or, like I saw someone do online, into the holes of the dhokla steamer. Basically, use something that will prop them up. If you’re making cake balls, then use a spoon to dip them and place them on a baking paper.
* If you plan to add sprinkles, now’s the time to roll the pops onto the sprinkles, while the chocolate is still wet. Once the chocolate hardens, you can keep them at room temperature or pop the extra ones into the refrigerator. I doubt you will have any leftovers.

Make a summery mosambi pie

img_92461.jpg

http://indianexpress.com/article/lifestyle/food-wine/make-a-summery-mosambi-pie/

Indian citruses work brilliantly for desserts.
Written by Bijal Vachharajani | Mumbai | Updated: March 15, 2016 3:26 pm
mosambi, pie, mosambi pie, Express recipes, citrus fruits, Ganga Jamuna, mosambi juice, sweet lime, sweet lime desserts, nimbu juice, lime pie,

Say the word ‘Ganga-Jamuna’ and most of us probably know that it doesn’t refer to a confluence of the two Indian rivers. Rather, it’s the name of a ubiquitous fruit mocktail which is a blend of narangi and mosambi juice. We are at a time when our shopping baskets are bursting with navel oranges and mandarins flown from different parts of the world, but Indian citruses have their unique flavours that work wonderfully in desserts. For instance, sweet limes or mosambis that grow mainly in the Northeastern part of India are equally sweet and tart to taste. You won’t find recipes for sweet lime desserts easily, but it’s not hard to swap lemon or oranges for this fruit.

Mosambi — when mixed with nimbu juice — as I discovered, is a fabulous substitute for key limes in key lime pie. And to be honest, no one in my house is a big fan of sweet limes — simply because they are too lazy to quarter the fruit and eat it. But mix it into a pie, and it’s gobbled up quickly. Also, it’s the perfect antidote to the relentless summer heat.

I turned to Smitten Kitchen’s recipe for the American dessert, which she has adapted from Miami-based Joe’s Stone Crab. But the recipe more or less holds the same across most cookbooks and is extremely versatile. If you don’t want to add sweet limes, making it with nimbu works fine as well.

Ingredients

For the crust

170g – Digestive biscuits
100g – Unsalted butter (melted and cooled)
3 tbsp – Sugar (granulated)
2 pinches – Sea salt

For the filling

1.5 tbsp – Sweet lime and lemon zest
3 large free range egg yolks (add an extra egg yolk if the eggs are small)
400g can – Condensed milk (1 can)
2/3 cup – Sweet lime juice and lemon juice (fresh, from 3-4 sweet limes and 2-3 lemons)

Method

* Preheat oven to 180° C.

For the crust

* Blend the biscuits in a mixer until they become fine crumbs. In a bowl, mix the biscuit crumbs, sugar and salt.

*Add the melted butter and mix it well.

* Use a 9-inch pie dish – I prefer to use the ones with false bottoms because it’s easier to remove the pie and cut it after baking. Spread the crumb mixture on to the bottom of the pie pan and then up the sides. You can press it with a bowl to make it evenly flat. Work quickly or the mixture will become gooier and difficult to spread.

* Bake the crust for 10 minutes until it’s light brown in colour. Leave it to cool.

For the filling

* Beat the citrus zest and egg yolks for five minutes until it’s thick and slightly pale in colour.

* Add the condensed milk and beat for another four minutes.

* Now add the freshly-squeezed citrus juice to the mixture slowly. Don’t over mix, or else your batter will curdle.

* Pour the batter into the pie crust and bake for another 10 minutes. You know the pie is done when it’s set — but it shouldn’t have brown spots on top.

* Cool and refrigerate for 4-5 hours. The pie tastes pretty much like key lime, only it’s slightly sweeter and more buttery yellow in colour.

* You can serve with a generous topping of sweetened whipped cream or sliced fruits.

– See more at: http://indianexpress.com/article/lifestyle/food-wine/make-a-summery-mosambi-pie/#sthash.Hc6N2USx.dpuf

Days and nights of nankhatai: A grandmother’s magical recipe, recreated

nankhatai1_759plus_bijal-vachharajani.jpg

http://indianexpress.com/article/lifestyle/food-wine/days-and-nights-of-nankhatai-a-grandmothers-magical-recipe-recreated/

A family that makes and eats nankhatai together stays together. Resurrecting my mother’s and aunts’ recipe.
 nankhatai2_759_Bijal Vachharajani

Diwali, for my mother and her four siblings, wasn’t complete without a mountain of homemade snacks. The coffee table groaned with painstakingly rolled mathiyas, crispy chaklis, poha chivda, coconut-stuffed ghughras, shakkar paras, and cardamom-laced nankhatais. Preparations started a week in advance under the watchful eye of my maternal grandmother. Recipes were perfected — a vatki (steel bowl) of this, a pinch of that — and committed to memory. Two days before the festival, the sisters would wake up early in the morning to prepare the nankhatai dough.

My grandmother’s recipe was simple and she used steel vatkis to measure the ingredients. Cardamom was mixed with powdered sugar until it became fragrant. The sugar was mixed with generous lashings of homemade ghee. Once the mixture was creamy and fluffy, maida and vanilla essence were added and kneaded into a crumbly, sweet-smelling dough.

Forty years ago, my mother’s family didn’t have an oven. So my mother and her sisters would pop the dough into containers and hop onto the local train to go to a bakery, five stations north to Andheri, in Mumbai. No one from the family can remember where this bakery was, except that it wasn’t too far from the station. There they would line up with other home bakers waiting for their turn at the oven.

My mother remembers this ritual with fondness — it was a time meant to be spent with her sisters, when they would chat, laugh and bond over one of their favourite foods. As they waited, they would tear off tiny pieces of cream-coloured dough and shape it into plump moons and lay it out on the massive aluminium trays provided by the bakery. A chironji was pressed to the center of the biscuit. The chironji, my mother said, added an almond-like flavour. When their turn came, the bakers would heft the aluminium trays into the industrial-sized oven, and in a matter of minutes the nankhatais would be ready to take home.

When I asked for the family recipe, it came to me in bits and pieces – my mother remembered the process, one aunt remembered the amounts, and another knew what didn’t go in. I set about recreating it, swapping vatkis with measuring cups, until I had anankhatai recipe that my mother approved of.

Most people when describing nankhatai call it an Indian version of the shortbread. I am not sure if I completely agree with that – the nankhatai is richer, flakier and more fragrant, the ghee adds a distinct flavour and texture. It’s crisp on the outside with a soft center that crumbles and melts in the mouth, releasing the sweet taste of cardamom. And, of course, the delicate biscuit is perfectly paired with a cup of masala chai.

Nankhatai
(Makes about 35 biscuits)

Ingredients
1 1/2 cup – Maida (flour)
1/2 cup – Caster sugar
1/2 cup – Ghee, at room temperature
1/4 tsp – Vanilla essence
1/2 tsp – Powdered cardamom
Toasted chironji seeds or slivers of pistachio and almonds, for topping

Method
* Using your hands, rub in the cardamom powder with the sugar until it’s fragrant.
* Now, add the ghee and mix until light and creamy. Add vanilla essence and mix well.
* Sift the maida and add to the mixture.
* Using your hands, knead the mixture into a slightly crumbly dough.
* Shape the dough into tiny balls.
* Flatten the biscuit slightly, and add a chironji or almond sliver to the centre. I couldn’t find any chironji in Bengaluru, and so went without.
* Bake at 170 degrees for 15-18 minutes.

When Bijal Vachharajani is not reading Harry Potter, she can be found looking for tigers in the jungles of India or baking in her tiny kitchen. In her spare time, she writes about sustainable development and is a consultant with Fairtrade Asia Pacific.

– See more at: http://indianexpress.com/article/lifestyle/food-wine/days-and-nights-of-nankhatai-a-grandmothers-magical-recipe-recreated/#sthash.oWqybg5G.dpuf

Bengaluru is waking up to homemade low-cal granola

http://indianexpress.com/article/lifestyle/food-wine/bengalurus-waking-up-to-home-made-low-cal-granola/

Making healthy, tasty granola is easier than you think. Ingredients can be easily swapped, and delicious quirks such as coffee or bits of chocolate make it more interesting.

Maegan

 In his book ‘Food Rules: An Eater’s Manual’, Michael Pollan says: “Don’t eat breakfast cereals that change the colour of the milk.” He goes on to explain, “This should go without saying. Such cereals are highly processed and full of refined carbohydrates as well as chemical additives.” The first Indian city that seems to have heeded his advice is Bengaluru. The city might love its ragi mudde and chow chow bhaat, but it is also a step ahead of the rest of the country as far as home-made breakfast cereals are concerned.


Ecologist Shivani Shah made her first batch of granola this month. Shah says, “I realised that the days I don’t make a slightly elaborate good Indian breakfast, or when I am travelling, I would end up with a make-do breakfast, and that compromise was making me quite unhappy.” Now, when Shah travels, she plans to pack breakfast in a jar.

According to the India Breakfast Cereal Market Outlook, 2021, the Indian breakfast cereal market has grown at a compound rate of 22.07 per cent over the last five years. Whether it is cold cereals such as corn flakes, chocolate or wheat flakes and muesli, or the hot oatmeal and wheat-bran variety, these foods seem to have become a convenient and permanent fixture at the breakfast table. Yet, the average box of supermarket cereal is often highly processed, enhanced with corn syrup and reinforced with synthetic vitamins.

Making granola isn’t a tedious task — toss the ingredients together and roast them in an oven, or on a stove. “An average breakfast cereal in its simplest form contains cooked and toasted grains, a sweetening agent such as sugar or honey, plus a flavour,” says Dr Chinthu Udayarajan, a senior food scientist at Synthite in Kolenchery, Kerala. “Flavour could be out of a bottle, or bits of fruits such as raisins, dried banana or strawberry, or even a pinch of cinnamon powde.” Shah pretty much follows that basic recipe — she roasts rolled oats, mixed nuts and seeds on the stove and adds coffee powder and coffee, along with dates and raisins for a bit of sweetness. The result is a delicious, toasty mix of nuts, fruit, seeds and oats.

The versatility of the granola makes it an appealing breakfast option, or even a nutritious mid-day snack. When journalist Neha Margosa couldn’t find the right mix of granola in stores, she decided to make her own. “I started making my own granola in mid-2015 when I did not have an oven and wanted to experiment with cooking,” says Margosa. “I discovered that granola could be easily made on the stove top.”

Ingredients can be easily swapped, and delicious quirks such as coffee or bits of chocolate make it more interesting. Margosa, for instance, adds toasted slices of coconut and pistachios, and little coffee decoction to her homemade granola. Maegan Dobson-Sippy has been making her own granola for the last six months. “I adapted a BBC Good Food recipe slightly to take into account what ingredients I can easily get,” says Dobson-Sippy, a freelance writer. “For example, I substitute maple syrup for date syrup, and vegetable oil for coconut oil.”

The flip side of home-made granola is that it doesn’t last as long as the one out of a box. “Making cereal at home means we have control on what goes in — that is, fewer and natural ingredients,” said Udayarajan. “If we don’t use antioxidants, the shelf life of the cereal could be reduced by half.”

However, all three granola makers agree that their home-made version is far more cost-effective and healthier than the ones available in the market. “Oats, chocolate and nuts are much cheaper when bought in bulk,” says Margosa. Shah agrees with Margosa. “Yes, it is cost-effective eventually, given that it is full of nutritious ingredients and even literally comparable to the cost of a simple dosa breakfast at mid-range Sagars (chain of restaurants) in the city.”

Home-made granola recipe
(Adapted from BBC Good Food)

Ingredients
2 tbsp coconut oil
125ml date syrup
2 tbsp honey
1 tsp vanilla extract
300g rolled oats
50g sunflower seeds
4 tbsp sesame seeds
50g pumpkin seeds
100g flaked almonds
100g raisins
50g coconut flakes

Method
* Preheat oven to 150 degrees C.
* On the stove, toast coconut on a skillet lightly.
* In a large bowl, mix coconut oil, date syrup, honey and vanilla extract. Add the remaining ingredients, except the dry fruit and coconut. Toss to mix well.
* On two baking sheets, spread the granola mixture evenly. Bake for 15 minutes. Now, add the coconut and dry fruit and bake for another 10-15 minutes.
* Remove from oven and immediately transfer to a flat tray or plate to cool.
* The granola can be stored in an airtight container for a month. Eat with cold milk or yogurt and sliced fruit.